
Résumer cet article :
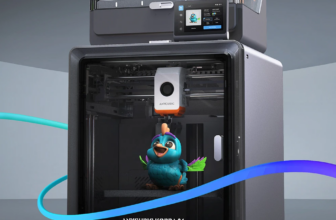
If the field of 3D printing has evolved significantly in recent years, so has that of laser engraving, whose technology is very similar. Creality, a well-known manufacturer in both fields, proves this with its new Falcon A1 Pro, a compact and sturdy laser engraver, which makes this technology accessible to everyone. With its 20 watts under the hood and a closed casing that inspires confidence, it indeed positions itself as a valuable ally for both beginners and experienced makers. No need to pull out the toolbox: here, everything is designed for a quick, safe, and smooth handling. And as a cherry on top, it features smart camera integration, which changes everything in use. If you’ve ever dreamed of marking, engraving, or cutting your DIY projects without a headache, hold on tight, as this Falcon A1 Pro might become your best buddy in the workshop. Let’s explore it in more detail.
Unboxing the Creality Falcon A1 Pro
Opening the Falcon A1 Pro box is completely different from the laser engravers I’ve had in the past, which were shipped in kit form.

Everything is carefully organized (almost too much; you find yourself recounting everything to make sure nothing is missing!).

Right away, the promise of accessibility jumps out at you: no lost bags of screws, no parts to assemble like a puzzle on a rainy night. Here, the star of the show proudly sits: the Falcon A1 Pro laser engraver, already assembled in its solidly encased shell, this “shell” reassures both parents and Sunday artisans. A stark contrast compared to kit machines where you have to play mechanic.

Everything is perfectly padded with foam, and all the accessories are inside the machine.

A power cable and a sufficiently long USB cable remind us that Creality aims for pure plug and play. There’s also a flexible tube for smoke extraction and a pump with its tube.

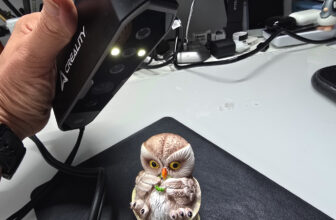
Upon lifting the lid, surprise: the mechanics exude seriousness, from the linear X rail to the laser, precision is the name of the game. You can sense that each component has its place, including the camera, discreetly mounted for a panoramic view of the engraving area.

This is somewhat discreet since it promises to guide your first creations like a next-gen GPS and is capable of focusing on the entire worktable. Imagine scanning an object to engrave exactly where you envision it, without the hassle of centering it to the millimeter. Yes, it works, and it changes the game!

What also strikes is the level of finish: no sharp edges, no play, and this metal casing that frankly resembles a small professional printer rather than a simple Chinese gadget.


The side panel hosts the ports (power, USB, power button, connector for rotation kit, etc.).

Not to forget the connector for the touchscreen, which will be the only element to assemble:

At the back, the air extraction:

Which benefits from a filtration system, with the filter being easily accessible from the inside:

In the box, we then find a starter kit, offering a test piece in wood, a calibration sheet, a clear manual, and some tools to adjust the laser head when needed. No protective glasses here, as the casing’s filtering window already limits exposure.

No need to bring out the screwdriver: four feet to install, a protection to slide, everything runs smoothly. Even the packaging, compartmentalized like a jewelry box, shows that Creality thought about the user experience from the first minute. It also turns out that the Falcon A1 Pro doesn’t forget safety: integrated child lock, physical emergency stop button, and a tinted acrylic window that avoids painful flashes to curious retinas.

And if you needed to convince the most cautious, a pre-installed air extraction system is provided for clearing the smoke: a real blessing if you’ve ever tested a engraver outdoors (and spent three evenings airing the room after each engraving).

This attention to detail is evident even in the small bags: spare screws (we’ve all experienced the drama of a lost part under the desk!), cleaning strips, and a well-sized power adapter for France.
We couldn’t finish the packaging tour without mentioning the manual, written in impeccable French (and illustrated!) for once. Each step is summarized, with a photo key, no guesswork needed to connect everything and start your first test. In short, there is no “instruction manual like a riddle” or mandatory Youtube video to understand where each part goes. A true relief for those who enjoy hassle-free testing.

What’s surprising, finally, is the packaging of the optical block. Well protected from shocks, the 20W module exudes robustness. There’s a mount for the laser head, detachable with a simple lever, and a metal plate ready to welcome your current inspirations. There’s also a calibration square and small tabs to help refine the height of materials, showing that Creality has thought of those who like to adjust everything to the finest detail.

This whole unboxing ritual leaves no room for chance: here, every detail counts. The Falcon A1 Pro immediately makes one forget about cobbled-together models and instantly ignites the desire to tackle your first project. Ultimately, that’s the strength of the Falcon A1 Pro right from the get-go: giving the impression that equipping oneself with a 20W laser engraver is not complicated, and that one can go from idea to reality without wasting time on unnecessary hassles.
Installing the Creality Falcon A1 Pro
From the moment of unboxing, think about removing the protective films on the colored panels (note that the one on the door sometimes requires removing the handle; a couple of turns of a screwdriver will do the trick). Then install the touchscreen: just clip a ribbon cable and insert the screen into its side support. This screen will allow you to operate the entire machine if needed, and even start an engraving directly.

Place the Falcon A1 Pro on a stable work surface, sufficiently cleared to accommodate its usable surface of 381x305mm, then connect:
- the air pump: fit the silicone tube onto the pump outlet, then connect the other end to the dedicated port on the right side of the Falcon.
- the smoke extraction system: attach the provided hose at the back and route it through a window, or connect it to a purifier if you’re working indoors.
- the power supply, then flip the main switch.
- insert the safety key (you won’t risk anything, without it the laser doesn’t turn on) and turn it in the direction of the open padlock.
- unlock the emergency stop button by turning it (no need to force, a quarter turn is enough).
With all elements connected and in place, the Falcon A1 Pro lights up and the internal LED lights up the engraving chamber. Rest assured, safety is paramount: the machine stops as soon as you open the lid or door, which limits unpleasant surprises, especially if children are around. It obviously features the usual protections such as flame detection, tilt detection, etc.

Now let’s move on to the software part. You must choose between Falcon Design Space (in-house software, free for Windows/Mac) or a classic like LightBurn (paid, more powerful for pros).
If you opt for Falcon Design Space, simply download it from the manufacturer’s website. Connect the Falcon A1 Pro to the computer via the provided USB-C cable. On first launch, a tutorial will guide you: model selection, quick installation video, connection to the engraver.

The software then asks to calibrate the camera. This step is crucial! The camera being wide-angle, the image is distorted by default. Calibration helps flatten the image, while being precise about the layout and placements of engraving or cutting. Use the provided calibration card, place it at nine points on the plate (the software guides you), and then take a photo each time. Move the card as instructed, confirm the capture scores (ideally above 50).

Then launch the proposed test engraving job: place the provided wood or acrylic sample, adjust the height of the laser head with the supplied thickness gauge (loosen one lever, place the head on the gauge, lower the lever) and confirm.

The software’s “inspiration” screen then offers access to a bank of models, account management, machine settings, various tutorials, and the main “canvas” for placing and editing your images for engraving.

No need to install drivers for recent Mac or Windows systems, detection is almost instant.
This Falcon Design Space software is not just for show: the interface welcomes you on a main “canvas” page with a view of the surface of the plate, positioned thanks to the built-in camera. Here’s what you can do, in detail:
- Import images (jpg, png, bmp), vector drawings (svg, dxf), add text or ready-to-use patterns through an embedded library.
- Resize, position, rotate all objects to be engraved, adjust the power and speed of the laser for each shape, and simulate the rendering before even pressing “Engrave”.
- Use the camera to precisely place your engraving: load an object, adjust its location using the real-time view of the plate, confirm, and the software determines the safe area.
- The software directly proposes pre-optimized settings (power, speed, passes), nothing to adjust manually.
- Create custom test grids (ideal for exploring the cutting of new materials), fine-tune machining areas, manage multiple layers to overlay engraving and cutting on the same object.
- Start batch engravings thanks to automatic batch filling and detection of multiple similar objects on the plate.

The software also manages firmware updates, plate inspection, advanced camera calibration, contextual help, and direct access to documentation. It’s comprehensive! For comparison, this Falcon Design Space is somewhat like the Bambu Studio software for the 3D printer Bambu X1C that we tested. Even though the community still needs to grow a bit to benefit from a larger library of models. But the software greatly helps facilitate user adoption.
The Falcon A1 Pro also offers a smartphone-controllable experience via the Creality Cloud app (available via APK on Android and on iOS sometimes under the name Creality Print or Falcon Design Space). Simply download the app, log into your account, and search for the engraver via Bluetooth. The app then provides a simplified dashboard: access to tutorials (well-made for beginners), a “canvas” space to prepare small engraving or cutting jobs, Creality store for accessories and consumables, and account management.


On the “canvas”, you can import files (photos from your mobile gallery, logos, illustrations), roughly resize them, access ready-to-engrave patterns or fonts, and then set the power, speed, and number of passes.
You can start an engraving, track its progress (status/time left), and pause or stop the process remotely.
However, be cautious: fine editing and detailed management are richer on a computer. The mobile version is designed to control routine jobs, start simple engravings, or quickly duplicate an already stored project in the Creality cloud, while precise adjustments of complex layers or professional functions remain reserved for the desktop software.

Finally, it is entirely possible to do autofocus and start an engraving directly from the touchscreen: select the file in memory, the material, and start the engraving.
The Falcon A1 Pro has truly been designed to simplify life at every stage: direct connections, active safety features, clear software, camera assistance, and automatic presets. The mobile app offers appreciated flexibility, while still retaining control over advanced features from the computer. The result: from the very first use, all conditions are met to transition from a drawing to a engraved reality, without stress or technical jargon.
User Feedback: From Fun Projects to Real Production
Now let’s launch our first creations! That are possible in just a few minutes on this model. Indeed, after connecting the Falcon A1 Pro to the computer, and after calibrating the camera, all you need to do is select or draw your design and position it on the view of the plate. Next, choose the material: adjust the power/speed the old-fashioned way (for example, soft wood at 3000mm/min 60%, plywood for multiple passes…), or select a preset from the software, which already offers numerous materials and their suitable settings. The laser adjusts through autofocus, which makes things easier. The AI vision system (integrating a smart camera and a red laser rangefinder) automatically activates focusing in less than 3 seconds, guaranteeing a measurement precision of less than 0.3 mm for a perfect cut on the first attempt. But for the most meticulous, it remains possible to adjust the focus manually using the gauge. You lock the laser head, close the lid, and then… laser fire!

Then you can follow the engraving in real-time on the screen, with the option to interrupt (emergency stop button or software).
To go further, Falcon also enables work in series (badges, keychains), cutting multiple shapes in one pass, or even transforming an STL file into cuttable slices for “home” 3D assembly.
Be careful, handling the Falcon A1 Pro quickly leads to the temptation to engrave and cut everything in the workshop, as ease of use quickly becomes apparent!
First Handling: The Wood Plate Test
Engraving on wood is the comfort zone of the Falcon A1 Pro. I started with a small wooden plate bought for a few cents at Action, a catchall style. We import a small graphic realization into Falcon Design Space, position it using the camera on the wooden plate, and off we go! The laser strikes the pattern with astonishing regularity.

The edges are sharp, the engraving dark depending on the chosen power, no excessive burning, no loss of detail, or overheating that “bleeds” on the fine letters. And the material stays perfectly secured thanks to the absence of vibrations.


Another example on a thicker and harder piece of wood, to make a trivet:

Personalizing a Wallet (Synthetic Leather): Guaranteed Wow Effect
Impossible to resist customizing everyday objects. I started attacking a small faux leather wallet (and later a rigid TPU phone case). The camera makes it easy to place the design on the cover, even with a slight curve of the support. A laser set to 30% power is enough to mark the leather without burning it or penetrating the thin upper layer.

The result? An engraved picture to personalize this wallet, without unpleasant odor or smudging. The laser head, well-cooled, does not sway and does not mark soft supports.
In the same vein, I tried engraving on a cork cover of a sketchbook, simply to add my name. Clean and perfect:

Cutting Acrylic: Finesse and Clarity on the Agenda
Now moving on to synthetic materials: here, we’re looking at a 2mm acrylic sheet, cut and engraved to create a small LED lamp with a photo. Be cautious when selecting the parameters: at full power (100%, 20Watts, 500mm/min), the cut passes without issue, but a slight residue scratches on the back, cleanable in a blink. Engraving on clear acrylic yields very precise results: the patterns remain sharp, and the edges are smooth if you set the plate on the metal bed (avoids melted residues). Even after a batch of twenty cuts, there’s no loss of intensity or visible variation.
Cardboard Test: Rapid and Effective Prototyping
To validate effectiveness on “low-end” materials, I cut templates for assembling a miniature house in single-wall cardboard (1.5mm thick). The Falcon A1 Pro doesn’t flinch: the cutting is clean, with no burning, the miniature windows detach on the first hit. Thanks to the integrated test grid, we refine the power to avoid burning the corners (45% and 2500mm/min, one pass), then we launch the production line. Result: perfect for rapid prototyping, creating models, or new shapes for fun or work.
Photo Engraving on a Plaque: Much More Than a Gadget
Want to push the machine? I tested engraving a black and white photo on poplar wood, image auto-vectorized by the software. The built-in camera helps place the piece, then after selecting the “raster engraving” mode, the Falcon A1 Pro reproduces the nuances of a photo with quite a decent level of detail. The contrasts were clean, and the nuance handling was gentle enough for the portrait to resemble something (not just a mass of black burns!).
Engraving on Metal: Perfect for Personalizing Jewelry!
For engraving on metal, even attempting marking on anodized aluminum, the physical limits of the 20W make themselves felt. But the Falcon A1 Pro can accommodate an IR laser (optional at €529, nonetheless), specially designed for engraving harder materials such as metal, silver, gold, etc.

The manufacturer has planned everything for replacing the laser module in just a few seconds: you unclip the block powering the laser, and replace it.

This way, you can change the laser module according to the tasks to be performed. The software automatically detects the connected laser. You simply need to indicate the type of metal being engraved in the software so that the correct parameters are applied. Here’s an example with a stainless steel spoon:


For engraving cutlery at a baptism or wedding, a pendant, a ring, a beautiful knife for a birthday, etc. The ideas are endless! And engraving on metal has an immediate certain appeal, as most people enjoy having a personalized item.
The Falcon A1 in Serial Production: Reliability and Consistency
Over a week of testing, no deviations: the Falcon endures hours of operation, hasn’t overheated even after long sessions, and the ventilation/extraction works well, limiting odors and smoke. No issues with advanced calibration, the camera remains stable over time, and settings are memorized from session to session.

By combining all these tests, the Falcon A1 Pro has proven to be a true creative Swiss Army knife. Making door signs, customizing bottles (by adding a rotating support, sold separately), producing puzzles, organizing a DIY workshop with children… everything becomes an excuse to whip out the machine. Professional uses are not excluded either: I have produced labels for wiring, marked tools, engraved gift boxes for friends. Each time, the output is quick, clean, and frankly impressive for a machine in this price range.
The Falcon A1 Pro has kept all its promises, bringing robustness, precision, and a playful dimension to creation: all it takes is an idea, and the tool follows, without technical barriers or discouraging jargon.
In Brief: Limits and Tips
The only complaint I might have about the Falcon A1 Pro? The delivery of a honeycomb plate, not provided by default, would have further improved cutting by preventing residues. Well, nothing insurmountable, you’ll just have to buy it as an option.


Conclusion
After spending time with the Falcon A1 Pro, it’s hard not to succumb to its charm. This compact and well-finished little beast combines power, precision, and safety, all wrapped in user-friendliness that is genuinely pleasing. Whether you are a complete beginner or a seasoned tinkerer, the machine reaches out to help you bring your ideas to life without hassle. The integrated camera changes the game for perfect positioning, and the software, whether on desktop or smartphone, offers a range of capabilities that will satisfy both the meticulous and the hurried.
Certainly, the Falcon A1 Pro doesn’t perform miracles on overly thick materials or metal (at least with the original 20W laser provided), but it excels in areas where most makers would like to express themselves: wood, acrylic, leather, cardboard… and even a little fine cutting that is always appreciated. The enclosed casing assures comfort and safety that one wouldn’t necessarily expect in this price range, and the provided accessories make life easier right from unboxing.
Ultimately, the Falcon A1 Pro stands out as an excellent compromise for anyone looking to equip themselves with a reliable, safe, and intuitive 20W laser, without getting bogged down in complex settings or tedious assembly. At €707 (down from €1179 for its launch, until August 18 only), it’s perfect for starting out or boosting your workshop. Note that you can also get an additional €10 discount with the code FAPO. At this price, it’s a machine that puts engraving within reach, and that’s already a huge advantage!
Be aware that preferential prices will be offered for its launch until August 18. First come, first served!


Please remain courteous: a hello and a thank you cost nothing! We're here to exchange ideas in a constructive way. Trolls will be deleted.